

Are you in trouble with the QuickBooks Cannot Communicate with the Company File issue? No need to worry, this is just a basic QB error that the users encounter when it cannot communicate with the company files due to the Windows Firewall error. In case of firewall blocking the company file communication, you will have this error in your system. In this post, we will help you guide each and every related issue and how to quickly diagnose it. Be with us till the end and we will learn together.
QuickBooks Cannot Communicate with the Company File Problem
When there is a failure in communication between QuickBooks and the company file, an error message can pop-up stating ”Cannot Communicate with the Company File.” This text message means that the software is installed in the system allowing sharing and access to the company file but still the QuickBooks application fails to connect with the company file for one reason or the other.
Also, the message error wants you to configure the firewall software or else you can also use QuickBooks Connection diagnostic tool for error troubleshooting.
In recent times, this problem is arising quite a lot and its occurrence is noticed majorly during the updating process of OS and the QuickBooks software to its latest available version.
Note: Intuit does not support antivirus or firewall programs. You must connect with the program provider for further assistance on installation and setup of your programs.
Reasons For Occurrence of this Issue
There can be a variety of reasons behind the existence of this error. The list is given below.
- The network data file is missing or lost.
- Invalid DNS Settings.
- The QuickBooks DBMS is not running on the server.
- Windows firewall error due to incorrect firewall configuration and setup.
- The server’s connection is lost and displays wrong configuration settings.
After knowing the reasons behind the error, we will aid you with the detailed solutions for rectifying this issue at the earliest. Check the solutions below.
Resolve the QuickBooks Cannot Communicate with the Company File Issue
Follow each and every solution as per the directions given below. They are as follows.
Method 1: Configure Firewall Settings Manually
- Navigate to the Start Menu and tap on the Search field.
- Within the field, write up Firewall and tap Enter.
- On the right hand panel, select the Advanced Settings.
- Now, reach out to the option Inbound Rules and do a right-click on it.
- Select the option New Rule.
- Go to the Program and click on Next.
- Select the Program Path and tap on Browse.
- Now, search for the path and click on Next.
- Assure that the option Connection is marked and click on Next again.
- Tick mark all the profiles and select Next.
- Provide the rule a name and tap on Finish.
- Repeat the above process for Outbound rules.
- Just you need to select the Outbound Rules option instead of Inbound Rules.
- Lastly, access the QuickBooks software in multi-user mode or the network mode to check for the prevalence of the error in the system.
Method 2: Automatic Update
- Under the QuickBooks Help menu, choose the option Update QuickBooks.
- Click on Update Now.
- Checkmark all the boxes.
- Choose the option Reset Update to remove all the existing update downloads.
- Select the option Get Updates.
- All the available latest updates will come upon the screen and you need to click on it.
- Lastly, restart the PC.
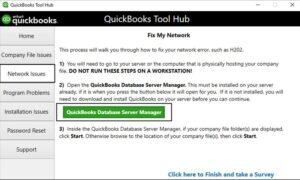
Method 3: Use QuickBooks Database Server Manager on Your Server
- Firstly, access the QuickBooks software and reach out to the tab Network Issues.
- Find QuickBooks database server manager and access it.
- Browse for the company file folder and select the option Start Scan.
- The QuickBooks Database Server Manager will self-resolve the Windows firewall error and other permissions.
- Finally, tap on the option Close as the scan is completed.
Method 4: Modifying Network Associated Windows 10 Settings
- To perform this method, access Windows 10 Sharing and go to the Start menu for sharing.
- Navigate to Manage Advanced Sharing Settings.
- On the right side panel, find All Network.
- Use the toggle button for turning off password protected sharing.
- Save these settings made.
- Now, launch the QuickBooks application and try connecting your company file, it must open easily till the other network issues exist.
Method 5: From QuickBooks Desktop
- The first step is to click on the File menu and select the option Close Company/Logoff.
- Select the file and close it.
- Now, from the desktop do a right click on the QuickBooks icon and tap on the option Run as Administrator.
- Assure that you are on the No Company Open desktop screen.
- Within the Help menu, choose the option Update QuickBooks.
- Tick Mark all the buttons and choose Save.
- Choose the option Reset Update to remove all the existing update downloads.
- Select the option Get Updates.
- Exit the QuickBooks Desktop and access it again.
- In case you get any message saying ‘install an update’, click on Yes.
- Lastly, after the successful installation, restart the computer system.
Method 6: Turning Off Hosting on Your Workstations
To carry out this method, turn off the Host Multi-user access option on all the workstations. Only your host computer must be the only hosting system.
- Access the QBs software on any one of your workstations and do not open the company file.
- Navigate to the File menu, Choose the option of Utilities.
- Do not tap on the Host Multi-User Access option and go to the next workstation.
- If you see anywhere the choice as Stop Hosting Multi-User Access, then click on it.
When you have accessed all the workstations, go to the host server PC and reset all the hosting settings.
- Open the QuickBooks application on the Host PC.
- Navigate to the File menu, Choose the option of Utilities.
- In case you get the option Host Multi-User Access, tap on it. Repeat the same process and select Stop Hosting Multi-User Access. Your multi-user mode settings will reset.
- Repeat the same procedure again and select the option Host Multi-User Access and check for the prevalence of the issue. If the problem still persists, jump onto the next method.
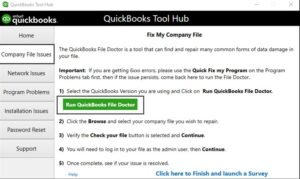
Method 7: Using QuickBooks File Doctor
- Firstly, access the QuickBooks Doctor File Tool.
- Browse for the company file in the system.
- Click on the tab named Run Quickbooks File Doctor.
- It will scan for the issues and after successful detection, the tool will self-resolve it in a few moments.
- Lastly, open the QuickBooks file again to check for the prevalence of the ongoing issue in your system.
Method 8: Create the Network Data file
The Network Data (.nd) file is a QuickBooks file type that stores the information of the host server computer that has the QuickBooks company files. This file is self-created when the user scans or accesses the company files.
- Open the Start Menu and tap on the Search field.
- Within the field, write up QuickBooks Database Server Manager and tap Enter.
*Note: In the drop down list, if you cannot get the QuickBooks Database Server Manager (QBDSM) then you must uninstall & install the QuickBooks software again. Assure yourself that you select the second option, “I’ll be using QuickBooks on this system, and I’ll be storing the company file here so it can be shared over our network to guarantee the QuickBooks Database Server Manager installation”.
- Navigate to the ‘QuickBooks Database Server Manager’ (QBDSM) dashboard, tap on the tab named Add Folder and browse to find the folder that has the QBs company files.
- Repeat the above process and select all the folders.
- Then, hit on the tab Scan.
- Once the scanning of all the QBs folders is done, reach out to the QuickBooks Company Files section.
- Lastly, navigate to the location of the QuickBooks Company File to verify that all the .nd extension files are created for each QBs data file.
Wrapping-Up
QuickBooks Cannot Communicate with the Company File issue occurs whenever there is a failure in connection between QuickBooks and the company file, an error text message displays quoting ”Cannot Communicate with the Company File. In this post, this QuickBooks and company file communication issue has been thoroughly discussed from its basic info, reason behind its existence to the easy solutions that will easily rectify this complex problem.
We have tried hard to put together our content in a structured way that eases you to understand all the solutions above quickly. I think it is time to part ways with each other and hope that you are satisfied with this post. For any further help, take our assistance from the other QuickBooks-related published articles on our official website.
Shabbir Ahmad is a freelance enthusiastic blogger & SEO expert. He is the founder of Shifted Magazine & Shifted News. He contributes to many authority blogs including porch, hackernoon & techcrunch.